
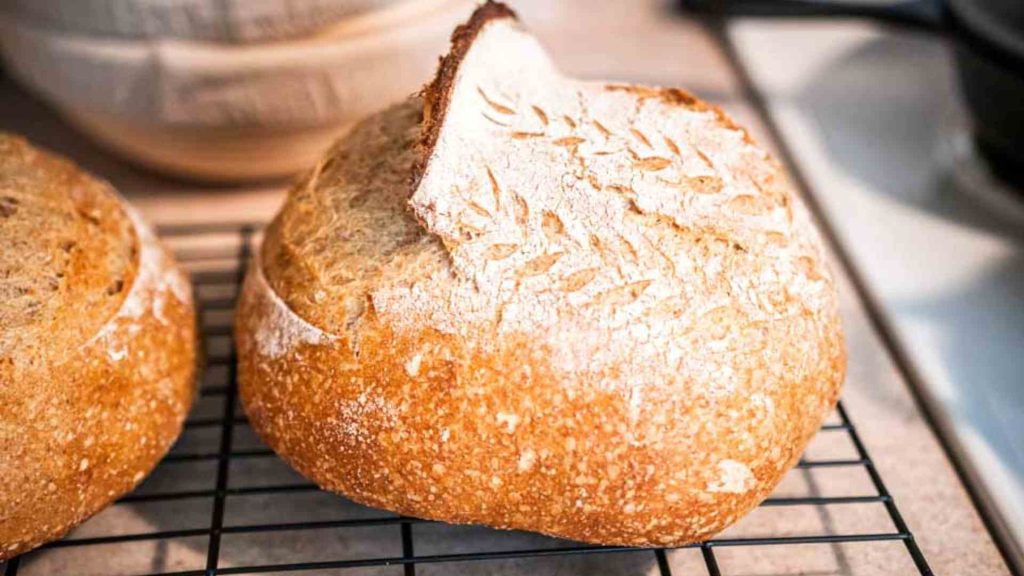
Easy Dutch Oven Sourdough Bread
If you love fresh sourdough bread with that deliciously crispy crust and light and airy crumb – this Dutch Oven Sourdough Bread recipe is for you. I have broken down the process into simple step-by-step instructions, making it easy enough for a total beginner. Use this tried and true recipe for making beautiful loaves of fresh sourdough bread!

This post contains affiliate links. As an Amazon Associate, I receive a small commission at no extra cost to you. Read my full disclosure here.
In this post, I’m going to show you how to make the simplest version of Dutch Oven Sourdough Bread. The process is not difficult, but there are quite a few steps involved. I promise I will guide you every step of the way! Whether you are completely new to sourdough or have been baking with sourdough for a very long time, this post is for you. If your social media pages are filled with beautiful sourdough artisan breads, you’re going to love this recipe for perfect sourdough bread. This is one of my favorite sourdough recipes that I have been making at least twice a week for my family.

what is sourdough?
Let’s start at the very beginning. What is sourdough bread? Great question! Sourdough bread is bread that has been leavened naturally, by naturally occurring yeast in the form of a sourdough starter as opposed to using commercial yeast or a chemical leavening agent such as baking powder or baking soda.
what is a sourdough starter?
A sourdough starter is a live fermented culture of fresh flour and water. Once combined, the culture will begin to ferment and cultivate the natural yeasts found in our environment. A small portion is added to your bread dough to make it rise, assuming you are using a healthy and active starter. Commercial yeast is not required.
This makes sense when you understand that natural “wild” yeast is all around us. It can be found in a bag of flour, in the air, on your hands etc. When we are able to capture that yeast and nurture it enough to grow and strengthen, we can add it to many different kinds of recipes. You can make your own sourdough starter at home by following these instructions: HERE…. or you could purchase a starter that has been dehydrated at it’s strongest state and rehydrate it at home. This is the method I recommend.
I highly suggest starting with a dehydrated sourdough starter that you rehydrate and activate in your own kitchen. This way, you are guaranteed to have a strong and active starter from the start. This will give you the confidence to begin sourdough baking right away. Once you have the hang of sourdough baking and know what to expect, then you can attempt to create your own starter. This way, you will be well acquainted with a healthy starter and know how to troubleshoot if issues arise.

how to care for a sourdough starter
In order to keep your starter alive you have to feed it. If you purchase a dehydrated sourdough starter from my Etsy shop, you’ll receive a card with detailed instructions of how to care for your sourdough starter. I’ll summarize here:
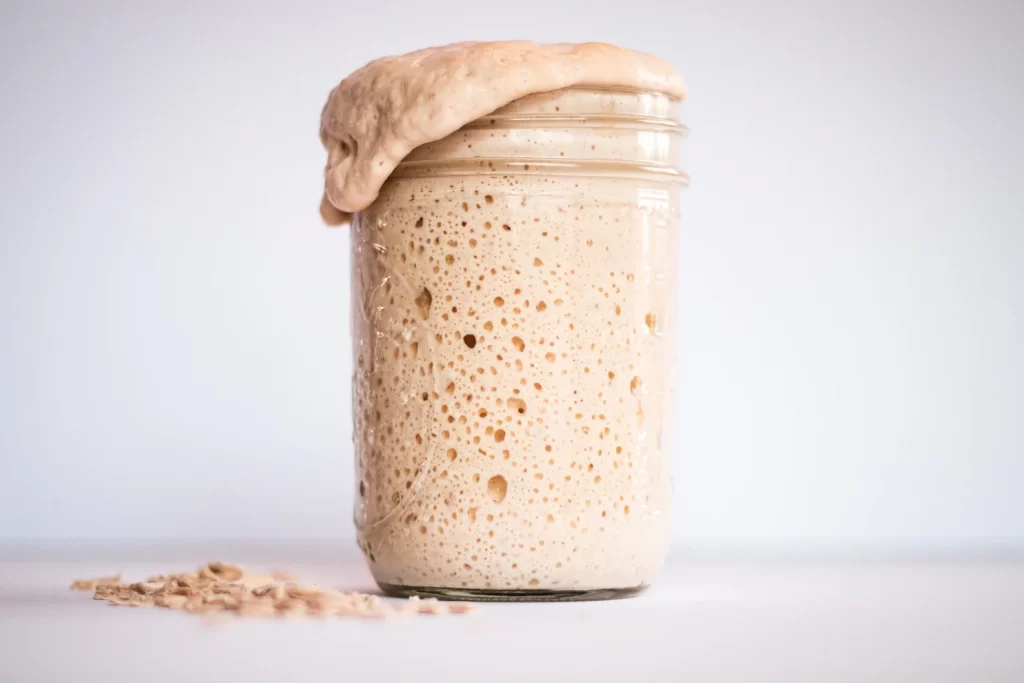
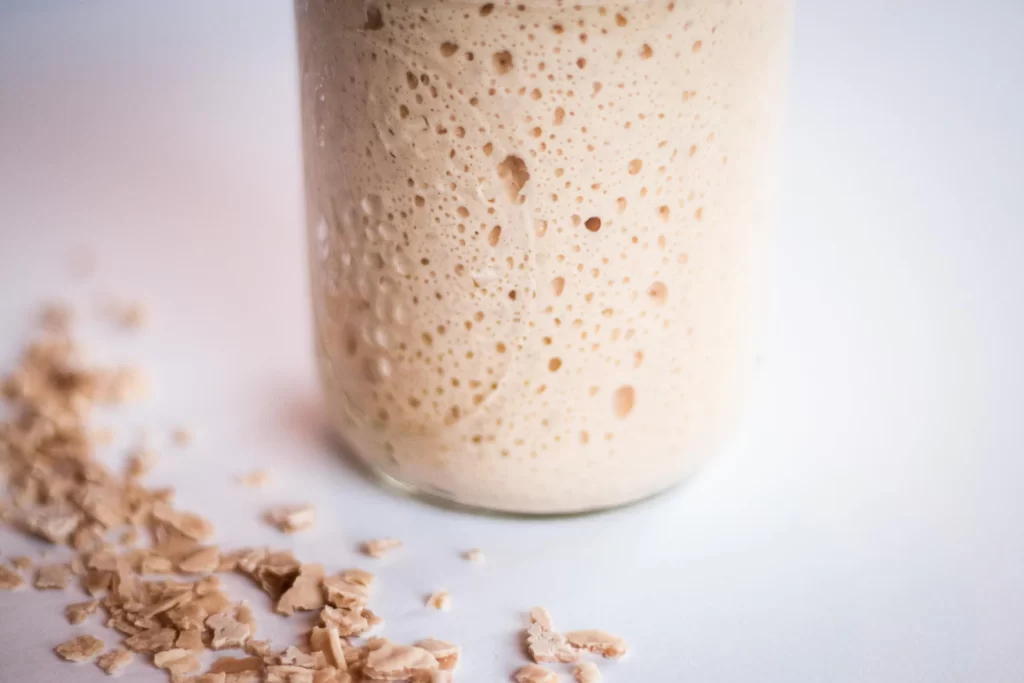
To feed your sourdough starter, you simply combine equal parts starter, flour and water by weight. give it a good stir and let it sit (covered but not sealed tight- I use a coffee filter and rubber band) until it expands and there are lots of visible bubbles. It’s good to use a glass jar or other clear container so you’re able to see the bubbles beneath the surface. If you’re feeding an already active starter, it will be ready to bake with after 4-6 hours.
I feed my starter every day or every other day. I bake something with it almost every day, so I usually just feed it after I take some out to use. If I’m baking bread, I feed it first thing in the morning and use it 4-6 hours later so it is at its peak strength.
Because the starter multiplies each time you feed it, you probably don’t want to feed all of it every time- or you would end up with a LOT of starter. And it would require a large amount of flour and water to sufficiently feed a large amount of starter. So I usually feed 100 grams of starter at a time and “discard” the rest.
Now, “discard” does not mean I actually throw it away. I stash it in the fridge to save for a sourdough discard recipe like these:
- Sourdough Discard Scones
- Sourdough Pancakes or Waffles
- Sourdough Chocolate Chip Cookies
- Sourdough Buttermilk Biscuits
- Sourdough Pie Crust
- Sourdough Discard Crackers
- Sourdough Crepes
If you find that you’re not using your starter every day, or even most days, it’s best to store your starter in the fridge. Give a good feeding and leave it sealed in the fridge until you intend to use it, and you won’t need to maintain it like you do if it’s at room temperature. This slows down the fermentation process and the yeast won’t eat up the flour and water nearly as fast. Pull it out the day before you want to use it, and give it 2 good feedings 6-8 hours apart and it should be active and bubbly and ready to use again.

how to know if your starter is ready to use
If your starter doubles in size within 4 to 8 hours after a feeding, it is ready to go. This is when it is at its peak strength, so this is the timeframe that you would ideally want to use it for baking. An easy way to tell if your starter has doubled in size is to put a rubber band around the jar that your starter is in when you feed it. Mark the height of the starter right after you feed it, so you can easily see when it has doubled in size and is ready to use.
Another way to test how active your starter is is the float test. After your starter has doubled in size, drop a spoonful into a glass of water. If it floats, it’s ready to use for baking!
If your starter is not doubling within 4 to 8 hours of feeding it, you should spend a few days strengthening it. To strengthen your starter, feed it twice a day for several days, but before each feeding, discard most of it and start a small amount again each time. Feed the remaining starter with equal parts flour and water. After a few days, your starter should be nice and active again.
ingredients required for dutch oven sourdough bread
- sourdough starter – see above
- flour – for best results, use a combo of organic, unbleached all purpose flour, bread flour and freshly ground (or whole wheat) flour
- filtered water – I use water filtered by our Berkey
- salt – a high quality salt like Redmond Real Salt
tools and equipment you’ll need
- kitchen scale
- straight-sided jar – for easily monitoring the rise and fall of your starter
- heavy bowl – for bulk fermentation, the weight of this bowl makes stretching and folding the dough much easier
- bench scraper
- banneton baskets
- bread lame – or razor blade
- dutch oven – this is the best dutch oven I have found without spending a lot of money
steps to make dutch oven sourdough bread – an overview
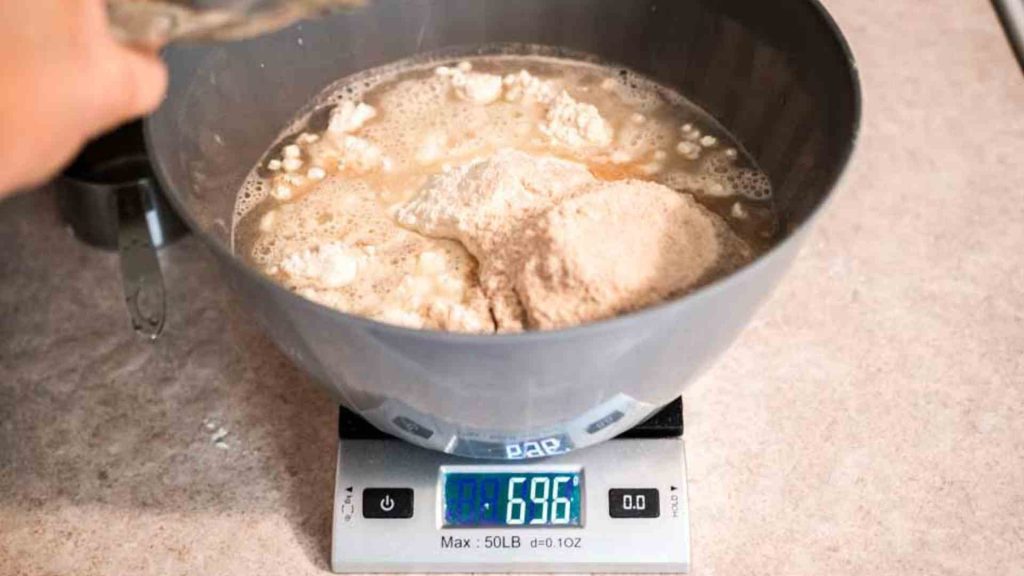
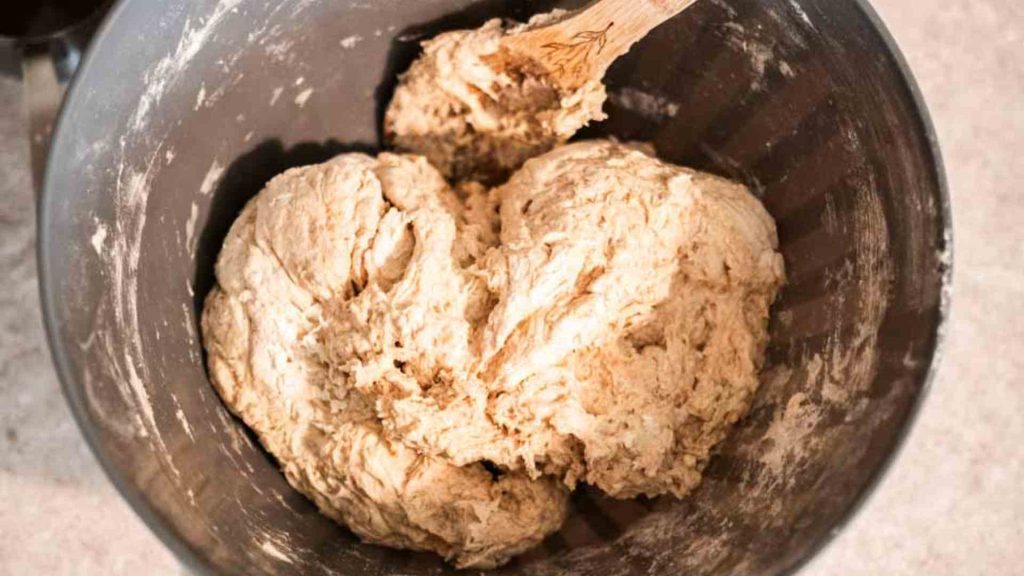
Mix the dough. First, combine the flour and water to allow the flour to absorb the moisture. Then, add active sourdough starter and salt to form a sticky ball. Knead for 5-10 minutes to fully incorporate the ingredients and begin to work the gluten.
Bulk ferment. This is an extended period of time that will allow the dough the first rise. During the first two hours of the bulk ferment, you will perform a set of coil folds which will give the dough strength and elasticity.
Shape & rest. This is the end of the bulk ferment. You will shape the dough, allow it to rest, and then shape it again.
Cold proofing the dough. This is when you refrigerate the dough for at least 12 hours, ideally. The easiest time to do this is overnight.
Scoring & baking the dough. After the dough has cold proofed, it is time to bake! Turn it out onto a piece of parchment paper, score it, and bake it in a preheated dutch oven.
step by step instructions to make dutch oven sourdough bread
Mix the Dough
1. Combine flour and water in a large bowl. Mix with a wooden spoon or dough whisk until it is thoroughly combined. Let sit for about half an hour so the flour can absorb the liquid. Then add the sourdough starter and salt. Knead with wet hands about 5-10 minutes until all the ingredients are well combined and have formed a sticky ball.
Bulk Ferment
2. Cover with plastic wrap or a damp kitchen towel and let the dough rest for 30 minutes. After 30 minutes, begin a series of coil folds. Perform a total of 4 coil folds every 30 minutes for the first 2 hours. Coil folds help to develop the gluten in a gentle manner. To coil fold: gently loosen the edges of the dough by pulling it away from the sides of the bowl. Place your fingertips under the dough so you can pick it up in the middle. Supporting the middle, allow the dough to fall on either side of your hands. Place one side down into the bowl first, and then the other so it folds like a letter. Turn the bowl 90 degrees and repeat – so you perform 2 coil folds per set.
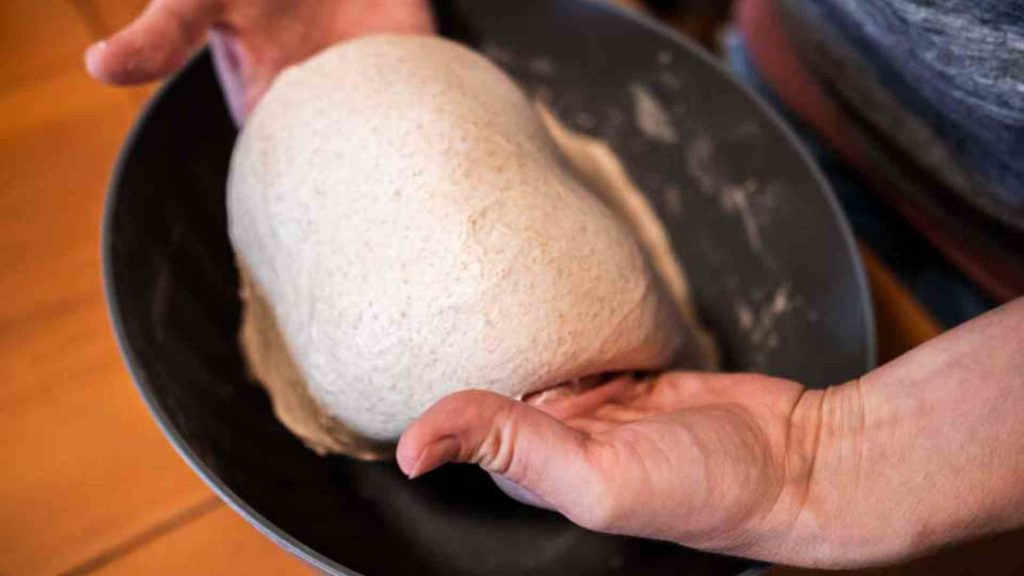
3. Cover the dough and allow it to rise until it has doubled in size. The amount of time that this takes will vary depending on the temperature in your kitchen. A warmer environment will cause the dough to rise much faster than a cooler environment.

Shape & Rest
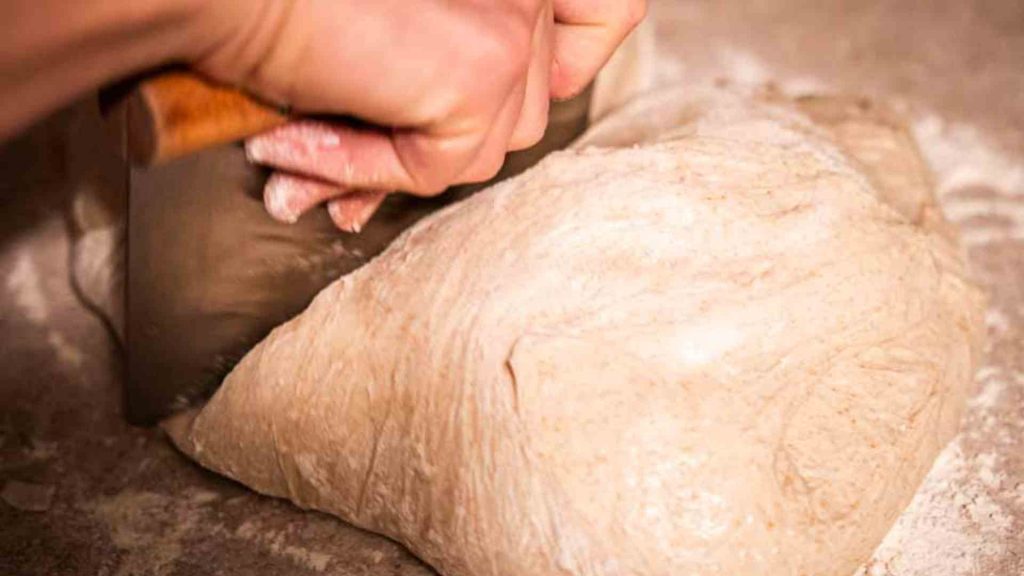
4. Turn the dough out onto a lightly floured work surface and cut in half using a bench scraper. Taking one half, tuck the edges underneath the dough ball and gently pull and push it away from you to build tension in the loaf. You want it to stick to your work surface just slightly so there is a little resistance there. Repeat with the other one. Let the dough rest for 15 minutes.

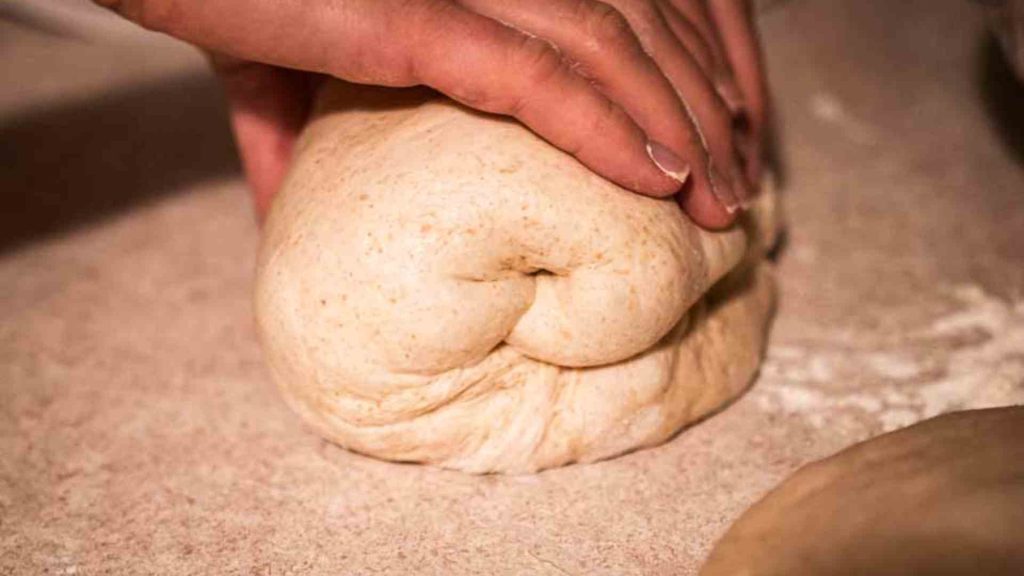
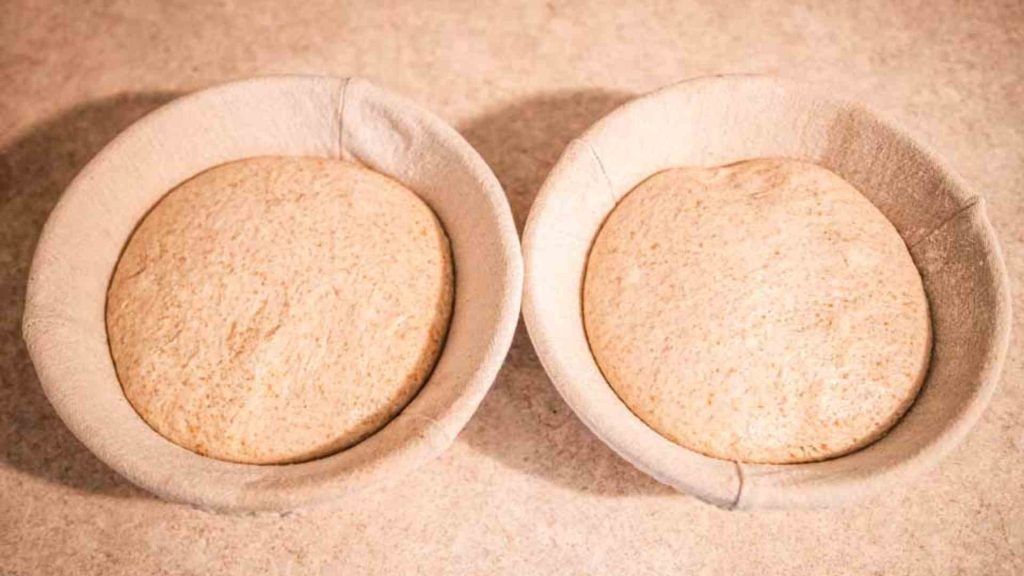
5. Then, shape into loaves. Gently press the bread dough slightly flat without popping all of those precious bubbles. Fold in thirds like an envelope, and then gently roll it up so the seam is hidden. Pinch the seam and sides closed. Place each of the loaves seam side up into a floured banneton basket.


Cold Proofing
6. Cover the banneton baskets with plastic wrap, a shower cap, or a plastic grocery bag tied up. You don’t want the loaves to dry out in the fridge. Refrigerate for 12-24 hours.
Scoring & Baking
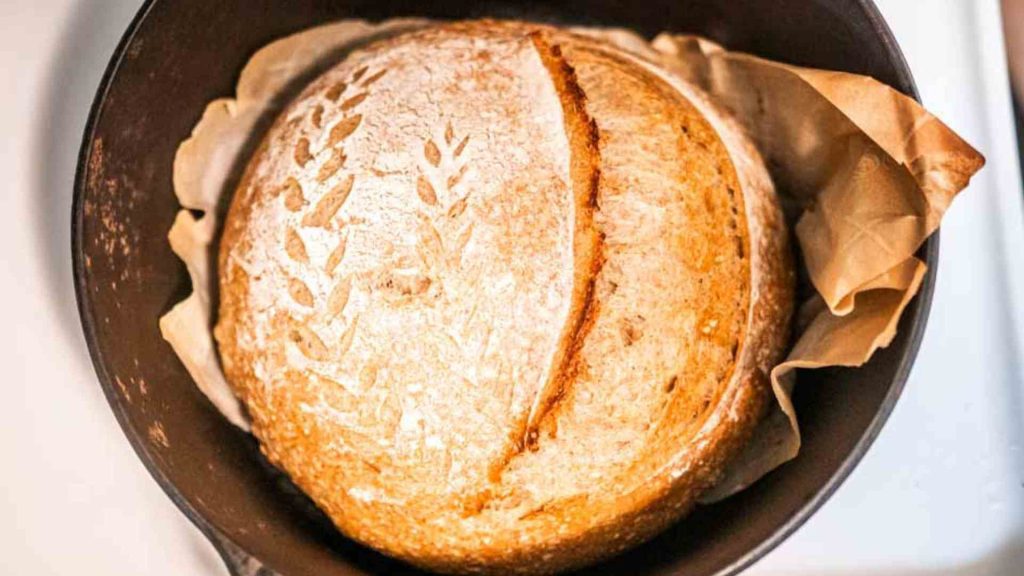
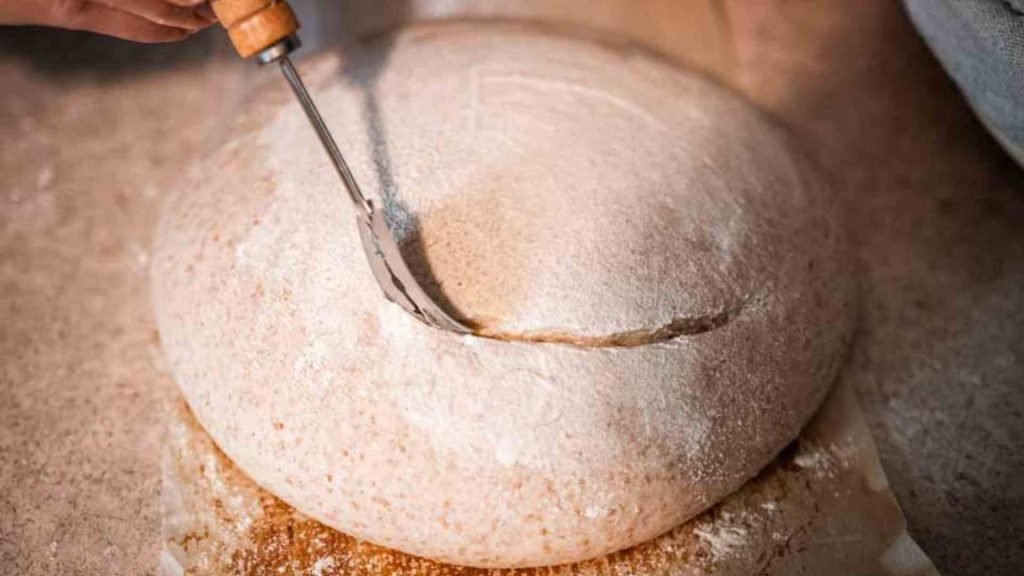
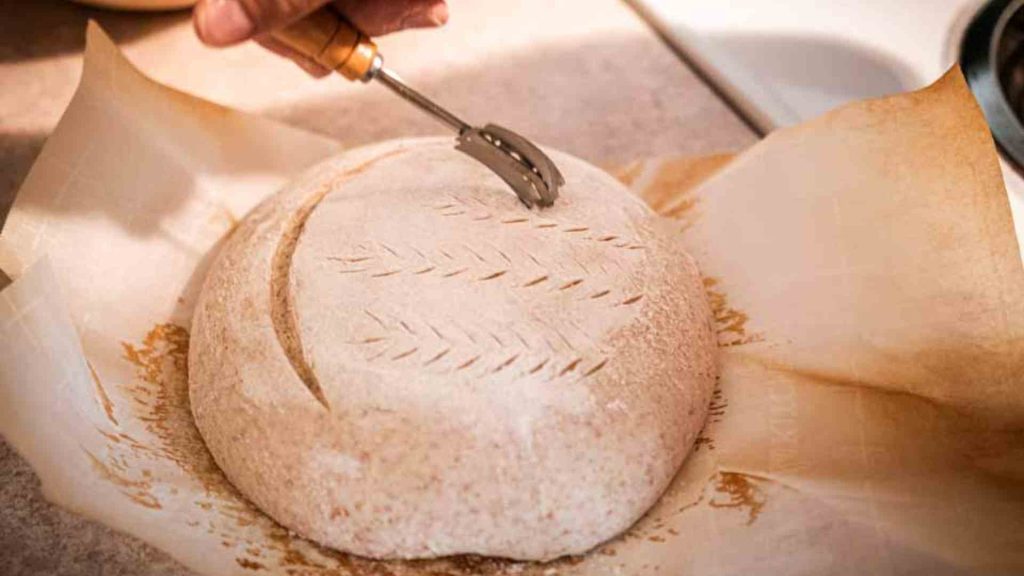
7. When you’re ready to bake your bread, preheat the oven temperature to 475 degrees F. Place the dutch ovens into the oven to preheat as well. Make sure that each cast iron dutch oven has a tight-fitting lid. After 45 minutes to an hour, remove the hot dutch oven. Turn out each loaf of bread onto a piece of parchment paper. Lightly flour the tops of each loaf. This will make your scoring patterns stand out more.
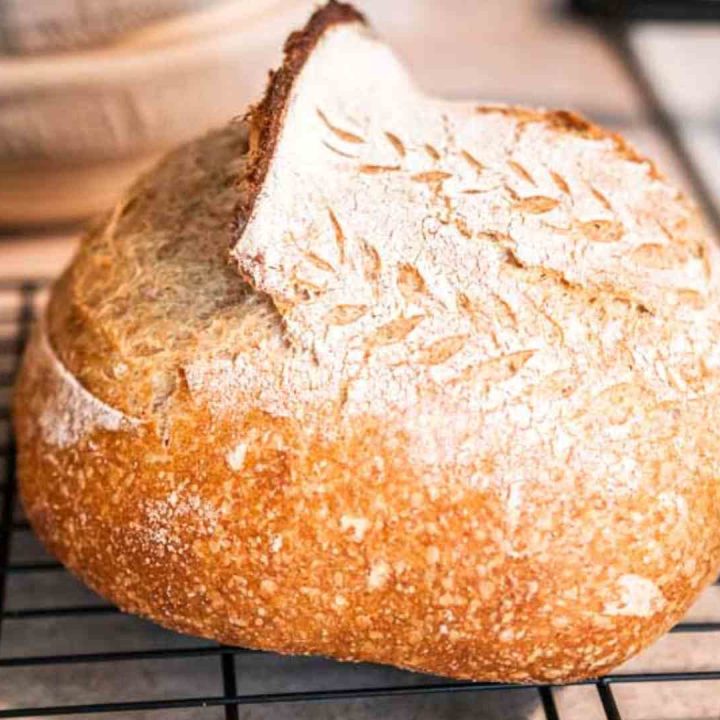
8. To score the dough – use a bread lame, a razor blade or a sharp knife to cut at least one deep cut into the loaf of bread. This can be curved or straight. This is called the expansion score. This is where the bread will expand instead of breaking apart in random places all over the top of the loaf. Next, if you’d like to, add smaller cuts to make a pattern or design. These cuts are called the decorative score, and should not be as deep.
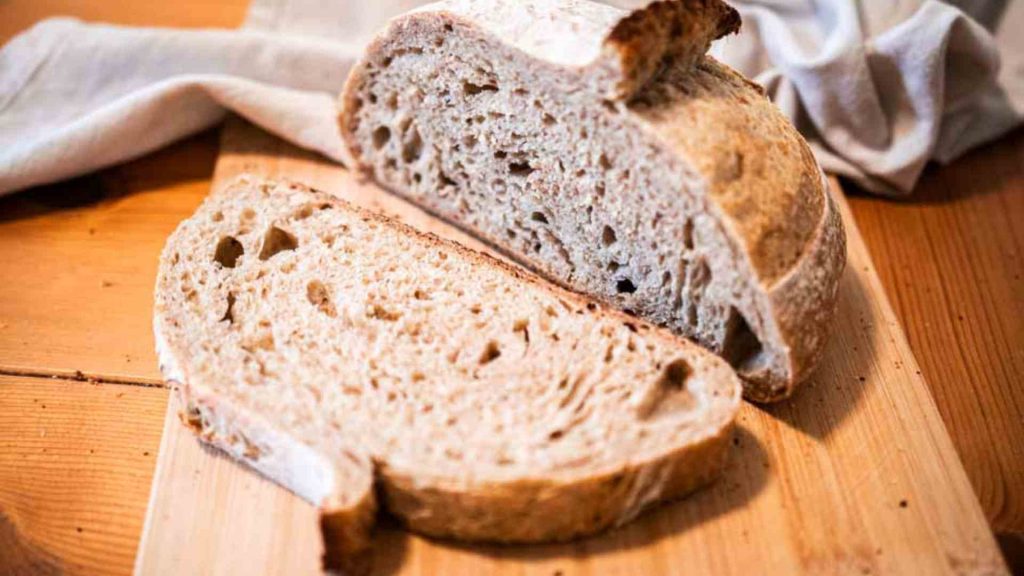
9. Place each loaf into a hot dutch oven and bake for 25 minutes. This time of baking at high heat will give the loaf a beautiful oven spring. Oven spring is when the dough hits the hot oven and puffs up in size before the crust starts browning. After 25 minutes, turn the heat down to 400, remove the lid and bake another 10-15 minutes, until the crust is golden brown. Bake it to your liking – the longer you bake it, the darker the crust will be.
10. Remove from the oven and cool on a wire rack for 1 hour before slicing.
sample sourdough baking schedule
If you are new to sourdough bread baking, the timing of it all may feel overwhelming – I totally get it! One very helpful tool in sourdough baking is the refrigerator! After you complete the dough on Day 2, it can stay in the refrigerator for up to 3 days. This will allow you some flexibility in the time you prepare the dough and when you bake it so you can have it fresh. Here is a rough schedule that I like to follow, and you can adapt it to work for you:
Day 1:
Evening – Remove sourdough starter from the fridge and feed it 1 part flour and 1 part water, by weight. Leave at room temperature overnight.
Day 2:
8:00 AM – Discard some of the sourdough starter from the night before and feed the remaining starter, 1 part flour and 1 part water, by weight.
12:00 PM – Mix flour and water.
12:30 PM – Add sourdough starter and salt and knead by hand for 5-10 minutes.
1:30 – 3:00 PM – Coil fold the dough every 30ish minutes. Total of 4 coil folds.
6:00-8:00 PM – Turn the dough out and divide in half. Form a ball and gently push it away and pull it toward you, building tension. Let rest 15 minutes, then shape loaves. Place in banneton baskets and cover. Refrigerate overnight.
(The timing of this step depends on the temperature of your kitchen, a warmer kitchen means your dough will double in size sooner and be ready for this step earlier than a cooler kitchen.)
Day 3:
Anytime – Preheat dutch ovens in 475 degree oven. Score and bake the bread. Let cool before slicing.

tips for scoring sourdough bread
Score directly from the refrigerator – cold dough is much easier to score, and the contrast in temperature will help with the dough rise even higher
Use a specialized tool – a razor blade or a bread lame are ideal for scoring
Create a score that’s wide enough and deep enough to allow your bread to rise – your expansion cut should be at least ¼ to ½-inch deep and should be large enough to allow your bread to rise fully. If you fail to score your dough enough, your bread may burst
Don’t score your dough too aggressively – the depth of the cut matters, if you cut too deep into your dough it may destroy the structure you’ve worked so hard to create during the bread making process
Coat your blade in a thin layer of oil – if you find that your blade drags while you’re scoring, rub a little bit of oil on your blade to help it glide smoothly through your dough
Make quick, confident cuts: scoring too slow will cause even the sharpest blade to drag and leave ragged marks on your dough
Bake your dough right away – letting your dough sit for too long before putting it in the oven may cause it to deflate and lose its strength
sourdough bread troubleshooting
If you ever have sourdough bread not turn out, it’s like caused by one or more of these common issues:
1. Using a weak starter, or a starter that is not at its peak strength.
2. Using too much water. This can depend on the humidity at the time of year. Adjust the amount of water depending on the season. On a humid, summer day, you will not need as much. The dough should be slightly sticky, but not too sticky to handle.3. Overfermentation. You don’t want to let either the first or second rise go too long.
4. Using too much whole wheat or freshly milled flour. Whole grain flours absorb more water than white flour and can result in a denser crumb.
recipe card for dutch oven sourdough bread
Dutch Oven Sourdough Bread
This Dutch Oven Sourdough Bread is easy to make, once you get the hang of it. Follow these thorough instructions to make your own beautiful sourdough boule.
Ingredients
- 550 grams organic, all purpose flour
- 250 grams bread flour
- 250 grams freshly milled or whole wheat flour
- 700 grams filtered water
- 250 grams active sourdough starter, at peak strength
- 25 grams high quality salt
Instructions
- Combine flour and water in a large bowl. Mix with a wooden spoon or dough whisk until it is thoroughly combined. Let sit for about half an hour so the flour can absorb the liquid. Then add the sourdough starter and salt. Knead with wet hands about 5-10 minutes until all the ingredients are well combined and have formed a sticky ball.
- Cover with plastic wrap or a damp kitchen towel and let the dough rest for 30 minutes. After 30 minutes, begin a series of coil folds. Perform a total of 4 coil folds every 30 minutes for the first 2 hours.
- Cover the dough and allow it to rise until it has doubled in size. The amount of time that this takes will vary depending on the temperature in your kitchen. A warmer environment will cause the dough to rise much faster than a cooler environment.
- Turn the dough out onto a lightly floured work surface and cut in half using a bench scraper. Taking one half, tuck the edges underneath the dough ball and gently pull and push it away from you to build tension in the loaf. You want it to stick to your work surface just slightly so there is a little resistance there. Repeat with the other one. Let the dough rest for 15 minutes.
- Then, shape into loaves. Gently press the bread dough slightly flat without popping all of those precious bubbles. Fold in thirds like an envelope, and then gently roll it up so the seam is hidden. Pinch the seam and sides closed. Place each of the loaves seam side up into a floured banneton basket.
- Cover the banneton baskets with plastic wrap, a shower cap, or a plastic grocery bag tied up. You don't want the loaves to dry out in the fridge. Refrigerate for 12-24 hours.
- When you're ready to bake your bread, preheat the oven temperature to 475 degrees F. Place the dutch ovens into the oven to preheat as well. Make sure that each cast iron dutch oven has a tight-fitting lid. After 45 minutes to an hour, remove the hot dutch oven. Turn out each loaf of bread onto a piece of parchment paper. Lightly flour the tops of each loaf. This will make your scoring patterns stand out more.
- To score the dough - use a bread lame, a razor blade or a sharp knife to cut at least one deep cut into the loaf of bread. This can be curved or straight. This is called the expansion score. This is where the bread will expand instead of breaking apart in random places all over the top of the loaf. Next, if you'd like to, add smaller cuts to make a pattern or design. These cuts are called the decorative score, and should not be as deep.
- Place each loaf into a hot dutch oven and bake for 25 minutes. This time of baking at high heat will give the loaf a beautiful oven spring. After 25 minutes, turn the heat down to 400, remove the lid and bake another 10-15 minutes, until the crust is golden brown. Bake it to your liking - the longer you bake it, the darker the crust will be.
- Remove from the oven and cool on a wire rack for 1 hour before slicing.
Notes
To coil fold: gently loosen the edges of the dough by pulling it away from the sides of the bowl. Place your fingertips under the dough so you can pick it up in the middle. Supporting the middle, allow the dough to fall on either side of your hands. Place one side down into the bowl first, and then the other so it folds like a letter. Turn the bowl 90 degrees and repeat - so you perform 2 coil folds per set.
pin this recipe
I have one 4.5 quart dutch oven. Is it possible to half this recipe? Do you have amy suggestions for me on how to go about this. I make sourdough often but I have never baked mine in a dutch oven before.
Yep! Just follow the same process with half of the ingredients.
Is there any way to make this recipe without the whole wheat flour?